 List接口及源码分析
作者:鱼仔
博客首页: codeease.top (opens new window)
公众号:神秘的鱼仔
# (一)List接口的概述
在前面我们讲完了Collection的特点和使用,接下来就开始讲Collection的子接口和实现类,List具有以下两个特点:
- 有序(不是指按数值大小有序排列,而是指插入和取出的顺序是固定的),因为List通过下标记录值
- 可重复,List可以添加重复的值,也可以添加重复的空值
List继承了Collection,所以Collection中的方法它都能使用,当然List也有属于自己的特有方法,下面就来介绍一下。
# (二)List的特有方法
public class ListTest1 {
    public static void main(String[] args) {
        List list = new ArrayList();
        //特有方法1.add(index,element)
        list.add(0,"a");
        list.add(1,"a");
        list.add(2,null);
        list.add(3,"b");
        System.out.println(list);
        //特有方法2.list.get(index)
        System.out.println(list.get(0));
        //特有方法3.list.indexOf(element) 查找第一个element的索引
        System.out.println(list.indexOf("a"));
        //特有方法4.list.remove(index)
        list.remove(0);
        System.out.println(list);
        //特有方法5.list.set(index,element)
        list.set(0,"d");
        System.out.println(list);
    }
}
2
3
4
5
6
7
8
9
10
11
12
13
14
15
16
17
18
19
20
21
因为List是继承Collection的,因此迭代器遍历和增强for遍历都适用于List,同时因为List存在下标,因此也可以像遍历数组一样遍历List。
# (三)ArrayList的底层和源码分析
集合的使用并不难,因此我们有必要去理解集合底层的原理和看它的部分代码。
Resizable-array implementation of the List interface. Implements all optional list operations, and permits all elements, including null. In addition to implementing the List interface, this class provides methods to manipulate the size of the array that is used internally to store the list. (This class is roughly equivalent to Vector, except that it is unsynchronized.)
以上这一段是ArrayList的官方文档介绍,来自Java Platform SE 8。这段文字的意思翻译过来就是指ArrayList是个可变数组,拥有了List的所有操作,运行任何元素,包括null。它还有属于自己的一些方法。ArrayList和Vector很相似,但是ArrayList是unsynchronized,即它不是线程同步的。
# 3.1 底层结构
我们已经知道了ArrayList的底层就是一个数组,在JDK8中:当初始化时,ArrayList中会初始化一个Object数组,容量为0;当要添加数据时,初始容量变为10,当第11个元素要进来时,容量扩容为15,当第16个元素要进来时,容量扩容为22。当每次要扩容时,都会扩容成原来容量的1.5倍。下面通过调试来分析一下部分源码:
# 3.1.1 首先写一个简单的arrayList添加元素的代码
public class ListTest2 {
    public static void main(String[] args) {
        ArrayList list=new ArrayList();
        for (int i=1;i<35;i++){
            list.add(i);
        }
    }
}
2
3
4
5
6
7
8
将断点设置在初始化ArrayList的位置,进入ArrayList构造方法,初始化时,ArrayList内部数组的容量被设置为0
public ArrayList(){
    this.elementData = DEFAULTCAPACITY_EMPTY_ELEMENTDATA;
}
2
3
接着进入add方法:
public boolean add(E e) {
    ensureCapacityInternal(size + 1);  // Increments modCount!!
    elementData[size++] = e;
    return true;
}
2
3
4
5
add方法并不复杂,首先进入ensureCapacityInternal()方法判断容量是否足够,容量足够就添加数据,进入ensureCapacityInternal方法:
private void ensureCapacityInternal(int minCapacity) {
    if (elementData == DEFAULTCAPACITY_EMPTY_ELEMENTDATA) {
        minCapacity = Math.max(DEFAULT_CAPACITY, minCapacity);
    }
    ensureExplicitCapacity(minCapacity);
}
2
3
4
5
6
当第一次添加数据时,minCapacity=0,满足if语句的条件,则通过Math.max方法设置第一次扩容的minCapacity=10,进入 ensureExplicitCapacity()方法
private void ensureExplicitCapacity(int minCapacity) {
    modCount++;
    // overflow-conscious code
    if (minCapacity - elementData.length > 0)
        grow(minCapacity);
}
2
3
4
5
6
此时minCapacity=10,elementData.length=0,首先对操作数加1,接着判断minCapacity于elementData长度的差值,大于0(即minCapacity容量不够用时)则进入grow函数
private void grow(int minCapacity) {
    // overflow-conscious code
    int oldCapacity = elementData.length;
    int newCapacity = oldCapacity + (oldCapacity >> 1);
    if (newCapacity - minCapacity < 0)
        newCapacity = minCapacity;
    if (newCapacity - MAX_ARRAY_SIZE > 0)
        newCapacity = hugeCapacity(minCapacity);
    // minCapacity is usually close to size, so this is a win:
    elementData = Arrays.copyOf(elementData, newCapacity);
}
2
3
4
5
6
7
8
9
10
11
grow函数用于对数组进行扩容,(oldCapacity >> 1)相当于(oldCapacity / 2)。第一次进入时minCapacity=10,oldCapacity =0,所以第四行的运算结果还是等于0,新的容量就变为10。第二次进入时(即minCapacity=11),newCapacity 就等于15,也就是我们之前所讲的1.5倍。
# (四)Vector与ArrayList的对比
vector目前已经很少用了,因此我们不过多介绍,主要说一下它和ArrayList的区别
Vector和ArrayList很像,底层也是一个数组,和ArrayList不同的是,Vector是线程安全的,它使用了synchronized关键词:

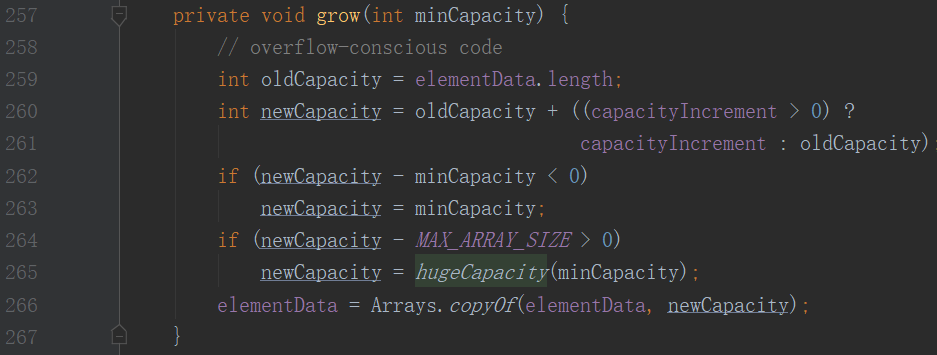
在扩容倍数上,ArrayList是1.5倍,而Vector是2倍,下面是Vector的grow函数源码:

第260行的代码展示了扩容操作。
# (五)LinkedList的底层和源码分析
Doubly-linked list implementation of the List and Deque interfaces. Implements all optional list operations, and permits all elements (including null).
LinkedList的底层结构是一个双向链表,拥有List的所有操作。
首先是两个重要的元素first和last,分别指向首结点和尾结点
另外每个节点(Node)也有三个属性:item、next、prev分别表示当前元素,前一个和后一个。
我们还是通过单步调试去看看LinkedList的内部执行逻辑,首先写一条简单的代码:
public class LinkedList1 {
    public static void main(String[] args) {
        LinkedList linkedList=new LinkedList();
        for (int i=1;i<10;i++){
            linkedList.add(i);
        }
    }
}
2
3
4
5
6
7
8
初始化的构造方法不包含其他的代码,直接进入add方法:
public boolean add(E e) {
    linkLast(e);
    return true;
}
2
3
4
然后再进入linkLast方法:
void linkLast(E e) {
    final Node<E> l = last;
    final Node<E> newNode = new Node<>(l, e, null);
    last = newNode;
    if (l == null)
        first = newNode;
    else
        l.next = newNode;
    size++;
    modCount++;
}
2
3
4
5
6
7
8
9
10
11
这段代码也容易理解,先设置l指向当前节点,再创建新节点,前指向l,后指向null。再根据是否是第一个插入的数据完成双链##表的连接。
# (六)三个实现类的对比
通过两个表格来表示三者之前的差距:
| 地层结构 | 版本 | 线程安全(同步) | 效率 | 扩容倍数 | |
|---|---|---|---|---|---|
| ArrayList | 可变数组 | 1.2 | 不安全 | 高 | 1.5 |
| Vector | 可变数组 | 1.0 | 安全 | 低 | 2.0 |
| LinkedList | 双向链表 | 1.2 | 不安全 | 增删高,改查低 | 不需要扩容 |
