 Oauth2是个什么东西?
作者:鱼仔
博客首页: codeease.top (opens new window)
公众号:神秘的鱼仔
# (一)前言
在之前的项目中只用到了SpringSecurity,后来发现公司的架构中有Oauth2,虽然自己在业务中没有过接触,但是觉得还是需要去了解一下,因此就有了这篇博客。本博客会从概念和简单的应用出发,讲解Oauth2的理论及实践,不涉及数据库等操作。
# (二)什么是OAuth2
OAuth(开放授权)是一个开放标准,允许用户授权第三方应用访问他们存储在另外的服务提供者上的信息,而不需要将用户名和密码提供给第三方移动应用或分享他们数据的所有内容,OAuth2.0是OAuth协议的延续版本,但不向后兼容OAuth 1.0即完全废止了OAuth1.0。
OAuth2协议包含几种角色:Client(客户端)、Resource Owner(资源拥有者)、Authorization Server(认证服务器)、Resource Server(资源服务器)。
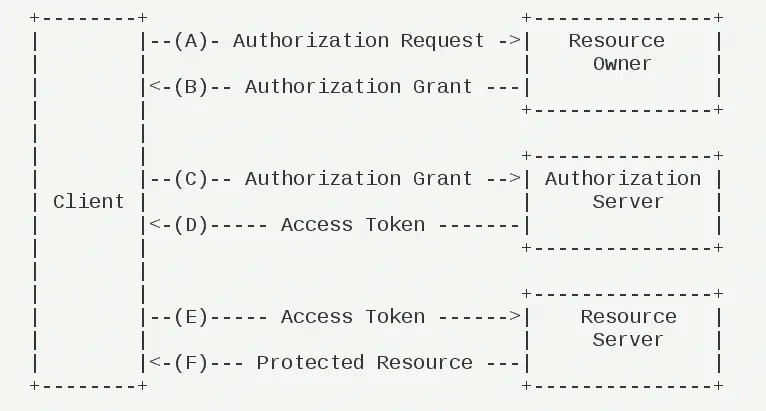
上面这副图很详细地描述了OAuth2协议的运行原理:
A:用户打开一个客户端,客户端发送请求给资源的拥有者
B:资源拥有者返回一个需要授权的结果
C:用户在客户端上进行授权,授权信息发送到认证服务器
D:认证服务器认证完成后返回令牌
E:客户端通过令牌去访问资源服务器
F:资源服务器返回相应的资源、
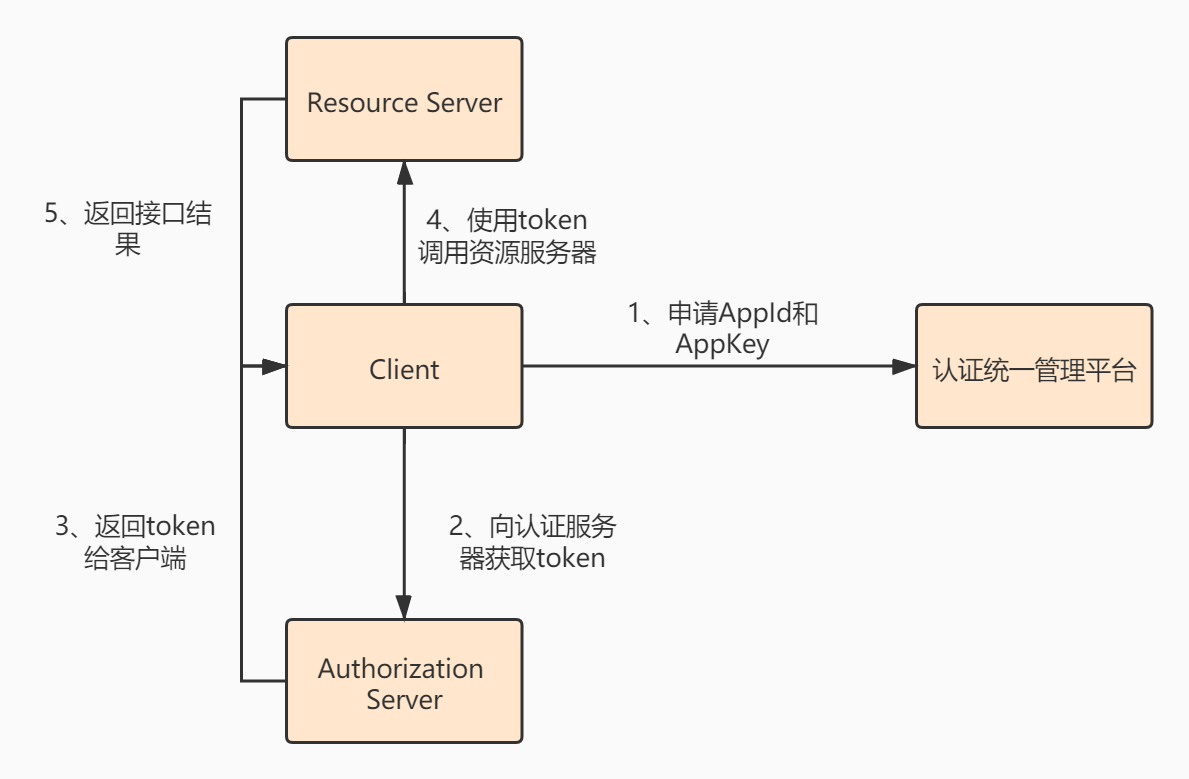
以某个网站使用微信第三方登陆为例:
A:用户通过客户端打开某网站
B:某网站返回需要第三方登陆的信息
C:用户通过扫码在客户端同意登陆
D:认证服务器返回登陆成功后的token给客户端
E:客户端拿着token访问资源服务器
F:资源服务器接收token返回相应的资源
# (三)OAuth2的应用场景
微信第三方就是OAuth2的应用场景之一。
我们在使用微信第三方登陆时,都需要先向微信申请到AppID和AppKey,然后拿着id和key去调用授权接口。
一般情况下大部分公司会将Oauth2应用在统一的认证中心,供第三方服务去访问他们的某些资源。
# (四)OAuth2协议的四种模式
# 4.1 授权码模式 authorization_code
最常用的模式,也是上面所讲的模式,根据请求获取token,用token来访问资源。因为不涉及用户名和密码的泄漏,因此更加安全。
# 4.2 密码形式 password
传递用户名和密码的方式,不安全。
# 4.3 简化模式 implicit
不通过授权码,直接向认证系统要token。用到的场景很少。
# 4.4 客户端模式 client_credentials
客户端通过自己的名义向认证服务器获取授权,这种场景也很少见,比如一台只有一台硬件可以访问某个系统,可以理解为客户端模式。
# (五)OAuth2认证服务器的实现
OAuth2只是一种协议,spring-security-oauth2是该协议的一种实现方式。接下来就通过spring-security-oauth2来实现认证授权。
# 5.1 引入依赖
首先引入项目中必要的依赖包
<dependency>
    <groupId>org.springframework.boot</groupId>
    <artifactId>spring-boot-starter-web</artifactId>
</dependency>
<dependency>
    <groupId>org.springframework.boot</groupId>
    <artifactId>spring-boot-starter-security</artifactId>
</dependency>
<dependency>
    <groupId>org.springframework.security.oauth</groupId>
    <artifactId>spring-security-oauth2</artifactId>
    <version>2.1.5.RELEASE</version>
</dependency>
2
3
4
5
6
7
8
9
10
11
12
13
# 5.2 SpringSecurity配置
如果使用spring-security-oauth2,在获取oauth2的授权之前,必须要先获取SpringSecurity的授权,因此我们先配置SpringSecurity:
@Configuration
@EnableWebSecurity
public class SecurityConfig extends WebSecurityConfigurerAdapter {
    @Override
    protected void configure(AuthenticationManagerBuilder auth) throws Exception {
        auth.inMemoryAuthentication()
                .passwordEncoder(new BCryptPasswordEncoder())
                .withUser("root")
                .password(new BCryptPasswordEncoder().encode("123456"))
                .authorities("/*");
    }

    @Override
    protected void configure(HttpSecurity http) throws Exception {
        http.authorizeRequests()
                .anyRequest().authenticated()
                .and()
                .httpBasic()
                .and()
                .csrf().disable();
    }
}
2
3
4
5
6
7
8
9
10
11
12
13
14
15
16
17
18
19
20
21
22
以上是最基本的SpringSecurity配置类,通过内存中设定的用户名root和密码123456进行登陆。
# 5.3 OAuth授权配置
AuthorizationServer配置的是一个认证服务器,当传入的条件满足配置时,就会在回调接口中带上对应的code值。下面的代码中主要配置了几个重要的参数,已经写在注释中。
@Component
@EnableAuthorizationServer
public class AuthorizationConfig extends AuthorizationServerConfigurerAdapter{
    @Autowired
    private BCryptPasswordEncoder bCryptPasswordEncoder;

    @Override
    public void configure(AuthorizationServerSecurityConfigurer security) throws Exception {
          //开启允许表单认证
         security.allowFormAuthenticationForClients()
                .checkTokenAccess("permitAll()");
    }

    @Override
    public void configure(ClientDetailsServiceConfigurer clients) throws Exception {
        clients.inMemory()
                //client_id
                .withClient("javayz")
                //secret
                .secret(bCryptPasswordEncoder.encode("my_secret"))
                //授权模式
                .authorizedGrantTypes("authorization_code")
                //作用域,也就是权限范围
                .scopes("all")
                //资源的ID
                .resourceIds("my_resource")
                //回调地址
                .redirectUris("http://localhost:8080/callback");
    }

    @Bean
    public BCryptPasswordEncoder bCryptPasswordEncoder(){
        return new BCryptPasswordEncoder();
    }
}
2
3
4
5
6
7
8
9
10
11
12
13
14
15
16
17
18
19
20
21
22
23
24
25
26
27
28
29
30
31
32
33
34
35
# 5.4 获取token方式
首先第一步,访问认证接口:
http://localhost:8080/oauth/authorize?client_id=javayz&response_type=code
第一次访问时,由于SpringSecurity的拦截,需要输入用户名和密码,我这里由于都是写在内存中的,因此输入root和123456即可。
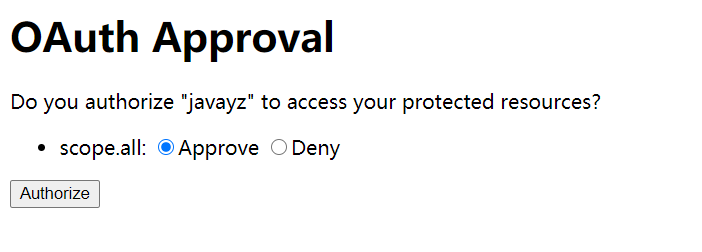
输入用户名和密码之后,oauth会让你选择是否授权,这一步可以理解为微信第三方登陆时,微信扫码后在手机上点击授权。
授权成功之后,会跳转到回调接口中,并且带上一个code值。
http://localhost:8080/callback?code=KGNujV
接着我们要拿上这些code值去获取token:
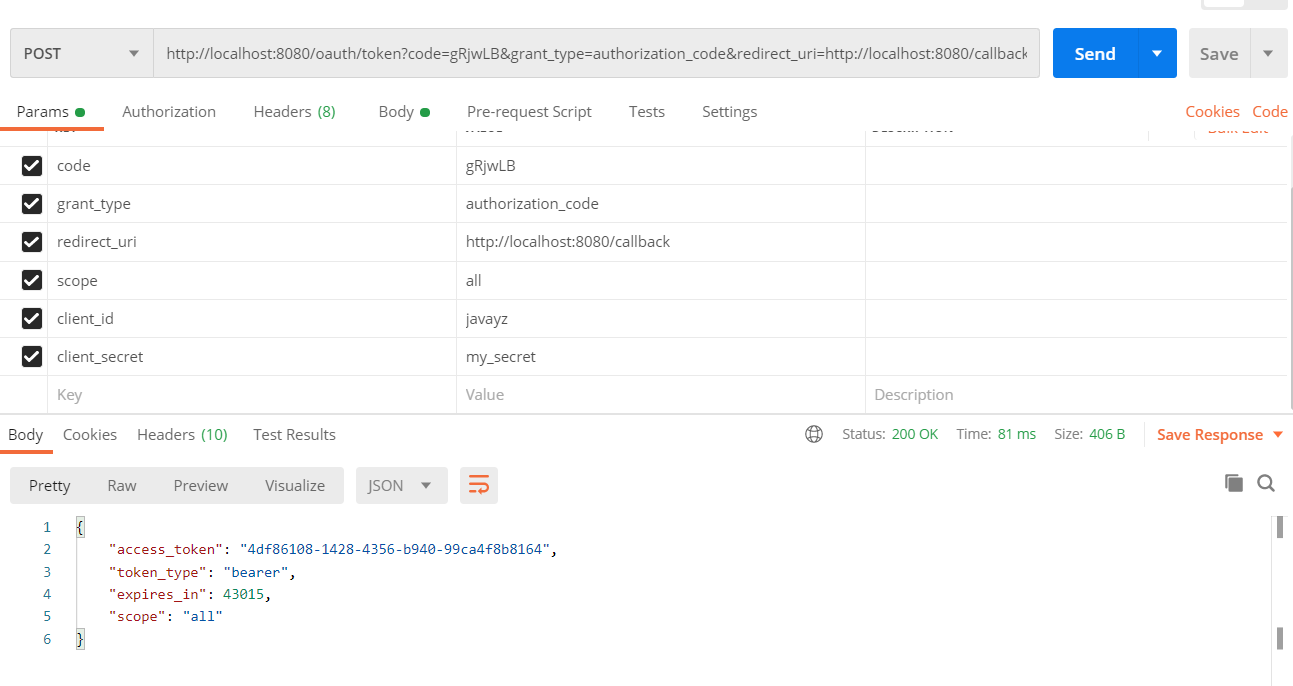
当所有的参数都填写正确的情况下,就可以拿到access_token
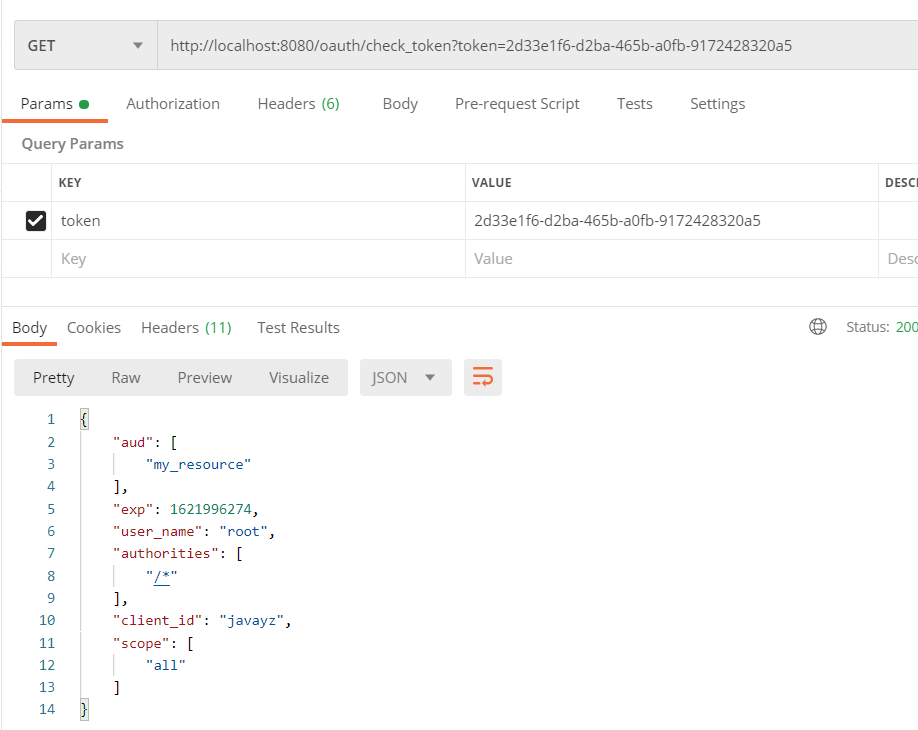
由于在上面的代码中,我们开启了允许表单认证,因此可以通过接口判断token是否有效:
# (六)Oauth2资源服务器的实现
写了认证后就需要写一个资源服务器进行验证,新建一个资源项目,启动的端口要和认证服务不同,编写资源服务器配置类:
@Configuration
@EnableResourceServer
public class ResourceConfig extends ResourceServerConfigurerAdapter {

    private static String ClientId="javayz";
    private static String Security="my_secret";

    @Autowired
    private BCryptPasswordEncoder bCryptPasswordEncoder;

    //token校验
    @Bean
    public RemoteTokenServices remoteTokenServices(){
        RemoteTokenServices tokenServices=new RemoteTokenServices();
        tokenServices.setCheckTokenEndpointUrl("http://localhost:8080/oauth/check_token");
        tokenServices.setClientId(ClientId);
        tokenServices.setClientSecret(Security);
        return tokenServices;
    }

    @Override
    public void configure(HttpSecurity http) throws Exception {
        http.sessionManagement().sessionCreationPolicy(SessionCreationPolicy.IF_REQUIRED);
        http.authorizeRequests().anyRequest().authenticated();
    }

    @Override
    public void configure(ResourceServerSecurityConfigurer resources) throws Exception {
        resources.resourceId("my_resource").stateless(true);
    }

    @Bean
    public BCryptPasswordEncoder bCryptPasswordEncoder(){
        return new BCryptPasswordEncoder();
    }
}
2
3
4
5
6
7
8
9
10
11
12
13
14
15
16
17
18
19
20
21
22
23
24
25
26
27
28
29
30
31
32
33
34
35
36
这段代码的核心是remoteTokenServices,这里需要定义token校验的地址,以及对应的client和secret。
接着写一个接口用来测试:
@RestController
public class TestController {
    @GetMapping("/test")
    public String test(){
        return "测试接口";
    }
}
2
3
4
5
6
7
由于在配置类中设置了所有请求都需要认证,所以当我们直接访问时,会提示无权限:

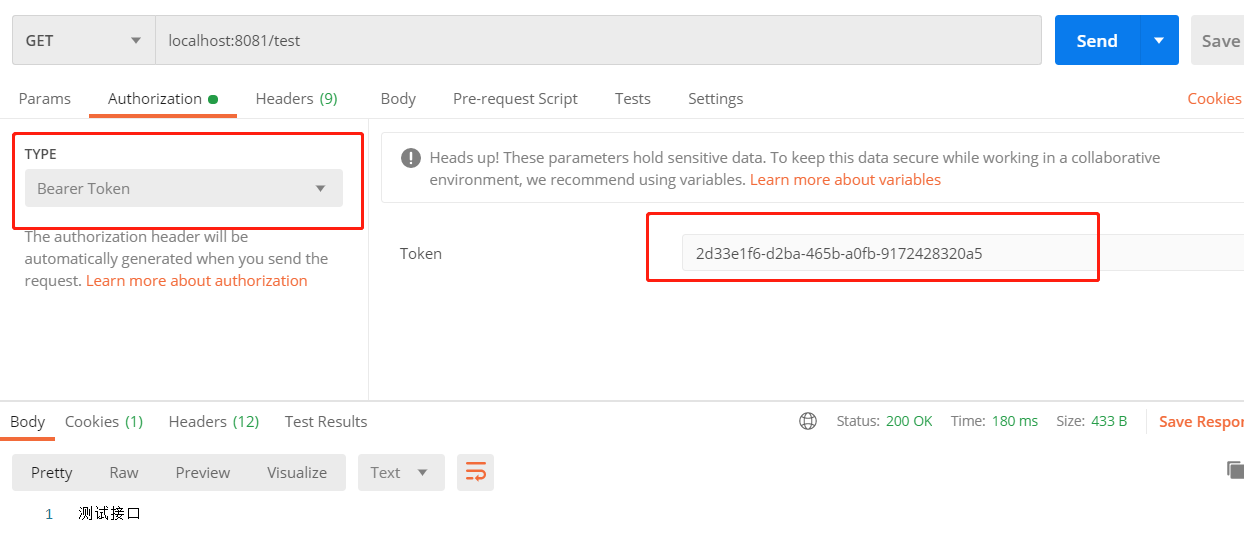
这个时候需要将上面生成的token放入认证信息中,有两种方式,第一种是Postman在Authorization中设置Bearer token
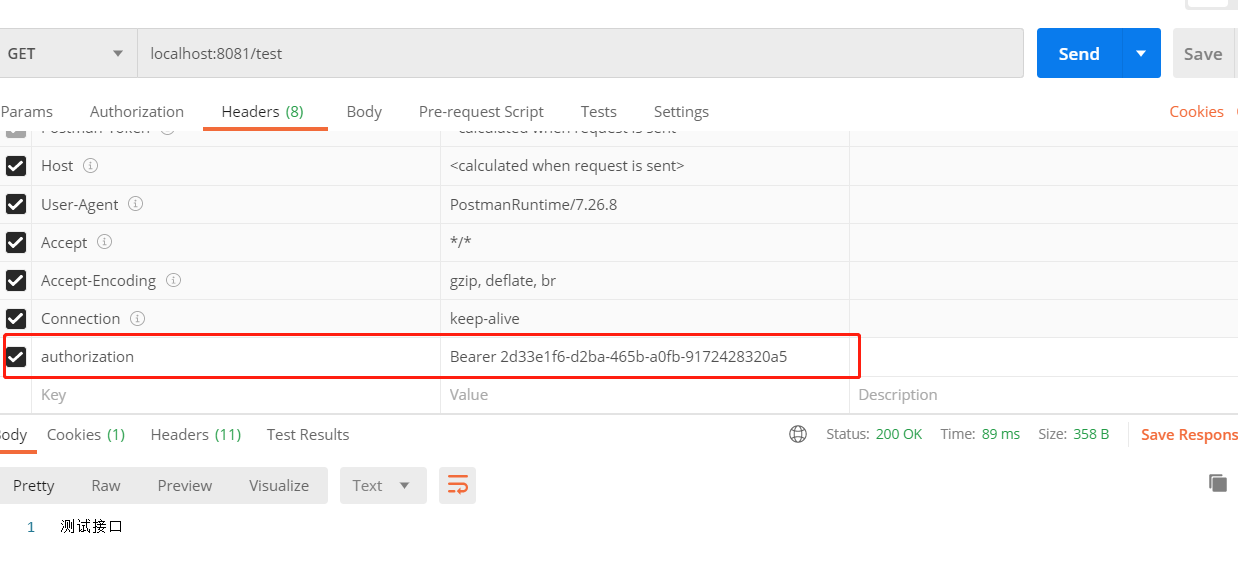
第二种方式是在请求头header中设置认证,注意token的前缀
# (七)总结
通过这篇博客,你应该知道了Oauth2是个什么东西,也可以在项目自己的项目中尝试着用一下。如果是公司层面的使用,还需要考虑其他的一些问题,比如用户信息的存储方式,token的生成方式等等。我是鱼仔,我们下期再见!