 想在一个项目中实现多数据源切换?几行代码就搞定了
作者:鱼仔
博客首页: codeease.top (opens new window)
公众号:神秘的鱼仔
# (一)场景
在实际的应用场景中,我们经常会遇到一个系统要调用多个数据源的情况。可能是同一个mysql的不同库,也有可能是从不同的mysql中调用数据进行使用。这里提供一种十分高效的多数据源切换框架---dynamicdatasource
# (二)介绍一下这个框架
dynamicdatasource其实是Mybatis-plus生态圈中的其中一个框架,来自码云知名开源项目 Mybatis-Plus 运营组织,这个组织还有个奇怪的名字叫做苞米豆。这是个挺有传奇色彩的组织,大家有兴趣可以了解一下。
# (三)开始使用
# 3.1 搭建项目
这一步就不需要多提了,搭建一个Springboot项目即可,引入基础的web依赖。
# 3.2 引入依赖
动态数据源的核心依赖是下面这个:
<dependency>
    <groupId>com.baomidou</groupId>
    <artifactId>dynamic-datasource-spring-boot-starter</artifactId>
    <version>3.1.0</version>
</dependency>
2
3
4
5
我们自己再引入JDBC三件套
<dependency>
    <groupId>org.springframework.boot</groupId>
    <artifactId>spring-boot-starter-jdbc</artifactId>
</dependency>
<dependency>
    <groupId>mysql</groupId>
    <artifactId>mysql-connector-java</artifactId>
    <scope>runtime</scope>
</dependency>
<!-- https://mvnrepository.com/artifact/org.mybatis.spring.boot/mybatis-spring-boot-starter -->
<dependency>
    <groupId>org.mybatis.spring.boot</groupId>
    <artifactId>mybatis-spring-boot-starter</artifactId>
    <version>2.1.3</version>
</dependency>
2
3
4
5
6
7
8
9
10
11
12
13
14
15
# 3.3 配置文件编写
在以前使用Mybatis的时候,我们只能配置一个数据源,现在可以通过动态数据源的方式配置多个数据源。
其中primary表示默认的数据源,strict表示设置严格模式,默认false不启动. 启动后在未匹配到指定数据源时候会抛出异常,不启动则使用默认数据源。
spring:
  datasource:
    dynamic:
      primary: master
      strict: false
      datasource:
        master:
          url: jdbc:mysql://localhost:3306/student
          username: root
          password: 123456
          driver-class-name: com.mysql.jdbc.Driver
        slave:
          url: jdbc:mysql://localhost:3306/books
          username: root
          password: 123456
          driver-class-name: com.mysql.jdbc.Driver
2
3
4
5
6
7
8
9
10
11
12
13
14
15
16
# 3.4 代码中切换数据源
通过一个注解就可以轻松切换数据源:
@Service
@DS("master")
public class TestService {
    @Autowired(required = false)
    private BookMapper bookMapper;
    @Autowired(required = false)
    private StudentMapper studentMapper;

    public String getName(){
        return studentMapper.getNameById("1");
    }

    @DS("slave")
    public String getBookName(){
        return bookMapper.getBookNameById("1");
    }

}
2
3
4
5
6
7
8
9
10
11
12
13
14
15
16
17
18
首先,我们可以给一个方法设置数据源,在内部的方法中也可以通过DS注解切换数据源,不用担心嵌套的问题。
# (四)完整项目
首先我建了两个库,一个叫student、另一个叫books
student库中有个student表:
CREATE TABLE `student` (
  `id` int(4) NOT NULL AUTO_INCREMENT,
  `name` varchar(10) NOT NULL,
  `grade` int(4) DEFAULT NULL,
  PRIMARY KEY (`id`)
) ENGINE=InnoDB DEFAULT CHARSET=utf8;
2
3
4
5
6
books库中有个book表:
CREATE TABLE `book` (
  `ID` int(11) NOT NULL,
  `BOOKISBN` varchar(255) DEFAULT NULL,
  `BOOKNAME` varchar(255) DEFAULT NULL,
  `AUTHOR` varchar(255) DEFAULT NULL,
  `PRICE` double DEFAULT NULL,
  `TYPEID` int(11) DEFAULT NULL,
  `PUBLISHER` varchar(255) DEFAULT NULL,
  PRIMARY KEY (`ID`)
) ENGINE=InnoDB  DEFAULT CHARSET=utf8;
2
3
4
5
6
7
8
9
10
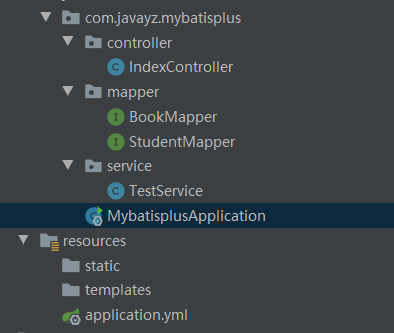
项目结构很简单:

首先是两个Mapper接口:
@Mapper
public interface BookMapper {
    @Select("select bookname from book where id=#{id}")
    String getBookNameById(@Param("id") String id);
}
2
3
4
5
StudentMapper :
@Mapper
public interface StudentMapper {
    @Select("select name from student where id=#{id}")
    String getNameById(@Param("id") String id);
}
2
3
4
5
然后是一个service
@Service
@DS("master")
public class TestService {
    @Autowired(required = false)
    private BookMapper bookMapper;
    @Autowired(required = false)
    private StudentMapper studentMapper;
    public String getName(){
        return studentMapper.getNameById("1");
    }
    @DS("slave")
    public String getBookName(){
        return bookMapper.getBookNameById("1");
    }
}
2
3
4
5
6
7
8
9
10
11
12
13
14
15
最后controller调用一下Service
@RestController
public class IndexController {
    @Autowired
    private TestService testService;
    @GetMapping("index")
    public String index(){
        String studentName = testService.getName();
        String bookName = testService.getBookName();
        return studentName+bookName;
    }
}
2
3
4
5
6
7
8
9
10
11
启动类中扫描一下Mapper
@SpringBootApplication
@MapperScan("com.javayz.mybatisplus.mapper")
public class MybatisplusApplication {
    public static void main(String[] args) {
        SpringApplication.run(MybatisplusApplication.class, args);
    }
}
2
3
4
5
6
7
这样一个简单的项目就搭建完成了,访问一下/index,就可以发现两个数据源中的数据都被提取出来了。
# (五)总结
如果你的项目中有类似的需求,不妨尝试一下这种方式。如果没有这样的需求,对这项技术混个眼熟也好。我是鱼仔,我们下期再见!
