 控制反转(IOC)和依赖注入(DI)的完美实现
作者:鱼仔
博客首页: codeease.top (opens new window)
公众号:神秘的鱼仔
本章的内容基于官方文档编写:https://docs.spring.io/spring-framework/docs/current/reference/html/core.html#spring-core
Spring版本为5.2.9
# (一)概述
IOC叫做控制反转,从本质上讲,IOC就是把原本由程序员创建的对象的这个动作交给Spring去实现,程序员无需再去管理对象的创建,这种方式可以大大减少系统的偶尔性。
没有IOC之前,对象的创建和对象间的依赖关系都完全编码在程序中,使用IOC之后,对象的创建由程序自己控制,使得程序解耦合。
IOC并不是一种技术,他是一种思想,即控制权反转的思想,DI(依赖注入)则是Spring实现IOC的方法。
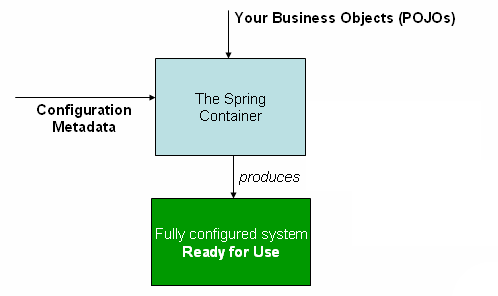
Spring容器在初始化时根据配置文件或元数据创建和组织对象存入容器中,需要使用时再从IOC容器中获取。
# (二)创建第一个Spring程序
1、首先确保你已经创建完成Maven项目并引入了Spring依赖,这里只需要引入spring-webmvc即可
<!-- https://mvnrepository.com/artifact/org.springframework/spring-webmvc -->
<dependency>
    <groupId>org.springframework</groupId>
    <artifactId>spring-webmvc</artifactId>
    <version>5.2.9.RELEASE</version>
</dependency>
2
3
4
5
6
2、创建实体类
public class User {
    private int id;
    private String name;
    //省略构造方法、get、set、toString方法
}
2
3
4
5
3、基于 XML 配置容器
<?xml version="1.0" encoding="UTF-8"?>
<beans xmlns="http://www.springframework.org/schema/beans"
       xmlns:xsi="http://www.w3.org/2001/XMLSchema-instance"
       xsi:schemaLocation="http://www.springframework.org/schema/beans
        https://www.springframework.org/schema/beans/spring-beans.xsd">
    <!--使用spring创建对象-->
    <bean id="user" class="com.javayz.pojo.User">
        <property name="id" value="1"/>
        <property name="name" value="javayz"/>
    </bean>
</beans>
2
3
4
5
6
7
8
9
10
11
其中id用来标识这个bean,class指向该类的全限定名
4、实例化容器
@Test
public void test(){
    //获取Spring的上下文对象
    ApplicationContext context = new ClassPathXmlApplicationContext("bean.xml");
    //获取bean
    User user = (User) context.getBean("user");
    System.out.println(user.toString());
}
2
3
4
5
6
7
8
只需要上面的四步,我们就实现了通过Spring创建对象。这个过程就是控制反转,由Spring的IOC容器来控制对象的创建权。
# (三)IOC创建对象的方式
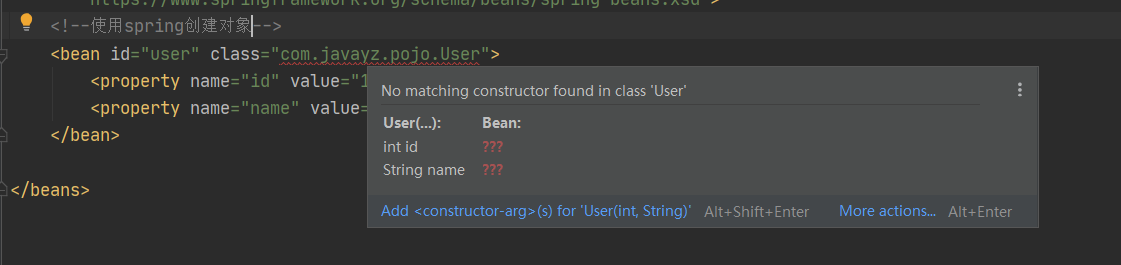
# 3.1、默认使用无参构造方法创建对象
这一点很好验证,如果我们把User对象的无参构造方法给去掉,你可以看到这样的报错信息:
当然也可以使用有参构造方法,我们需要用到另外一个参数constructor-arg
<!--使用spring创建对象-->
<bean id="user" class="com.javayz.pojo.User">
    <constructor-arg index="0" value="1"/>
    <constructor-arg index="1" value="javayz"/>
</bean>
2
3
4
5
上面是通过下标的实现方式,再来看一下通过变量名的方式
<bean id="user" class="com.javayz.pojo.User">
    <constructor-arg name="id" value="1"/>
    <constructor-arg name="name" value="javayz"/>
</bean>
2
3
4
构造器注入是Spring依赖注入的一种方式,接下来我会把其他的几种注入方式都介绍一遍。
# (四) Spring的配置
Spring的配置文件没有太多参数,这里就来总结一下
# 4.1 alias标签
别名就是你可以给bean的id换一个其他的名字
<bean id="user" class="com.javayz.pojo.User">
    <constructor-arg name="id" value="1"/>
    <constructor-arg name="name" value="javayz"/>
</bean>
<alias name="user" alias="user2"/>
2
3
4
5
现在使用user和user2都可以访问到这个bean
# 4.2 bean标签
bean标签是通过xml配置中最常用的,主要会用的几个参数
id :bean的唯一标识
class :bean对象所对应的全限定名
name : 别名,可以取多个名字
scope : 作用域,Spring默认作用域是singleton
<bean id="user" class="com.javayz.pojo.User" name="user3" scope="singleton">
    <constructor-arg name="id" value="1"/>
    <constructor-arg name="name" value="javayz"/>
</bean>
2
3
4
# 4.3 import
import标签可以把多个xml配置文件导入到一个总的配置文件中供程序员调用。
<import resource="bean.xml"/>
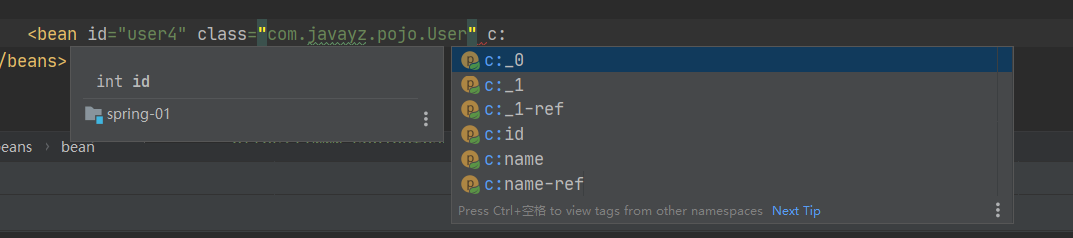
# 4.4 cp命名空间
c命名空间和p命名空间可以简化xml文件
使用时首先需要引入xmlns
xmlns:p="http://www.springframework.org/schema/p"
xmlns:c="http://www.springframework.org/schema/c"
2
c命名空间可以直接在bean标签下注入构造器
p命名空间可以直接注入属性的值

# (五)依赖注入的两种方式
# 5.1 构造器注入
构造器注入就是前面所讲的方式,通过无参或者有参的构造方法注入对象。
# 5.2 Set方法注入
Set方法可以注入更加复杂的对象

官网说Set方法支持上面这九种方式的注入,我们来模拟一下 我们新建一个User类包含上面的所有复杂类型:
public class User {
    private String name;
    private Father father;
    private String[] arrays;
    private List<String> list;
    private Map<String,String> map;
    private Set<String> set;
    private Properties prop;
    private String isNUll;
   //不需要构造方法 , 省略get、set、toString
}
2
3
4
5
6
7
8
9
10
11
然后在bean的xml中来注入所有值
<?xml version="1.0" encoding="UTF-8"?>
<beans xmlns="http://www.springframework.org/schema/beans"
       xmlns:xsi="http://www.w3.org/2001/XMLSchema-instance"
       xsi:schemaLocation="http://www.springframework.org/schema/beans
        https://www.springframework.org/schema/beans/spring-beans.xsd">
    <bean id="father" class="com.javayz.pojo.Father"/>
    <bean id="user" class="com.javayz.pojo.User">
        <!--基础类型用value注入-->
        <property name="name" value="javayz"/>
        <!--bean注入,使用ref -->
        <property name="father" ref="father"/>
        <!--数组注入,使用array -->
        <property name="arrays">
            <array>
                <value>array1</value>
                <value>array2</value>
            </array>
        </property>
        <!--list注入,使用list -->
        <property name="list">
            <list>
                <value>list1</value>
                <value>list2</value>
            </list>
        </property>
        <!--map注入,使用map -->
        <property name="map">
            <map>
                <entry key="1" value="a"/>
                <entry key="2" value="b"/>
            </map>
        </property>
        <!--set注入,使用set -->
        <property name="set">
            <set>
                <value>set1</value>
                <value>set2</value>
            </set>
        </property>
        <!--Prop注入,使用prop -->
        <property name="prop">
            <props>
                <prop key="key1">value1</prop>
                <prop key="key2">value2</prop>
            </props>
        </property>
        <!--NUll注入,使用null -->
        <property name="isNUll">
            <null/>
        </property>
    </bean>
</beans>
2
3
4
5
6
7
8
9
10
11
12
13
14
15
16
17
18
19
20
21
22
23
24
25
26
27
28
29
30
31
32
33
34
35
36
37
38
39
40
41
42
43
44
45
46
47
48
49
50
51
52
# (六)总结
上面展示的所有内容其实都可以在官方文档中找到,只不过官方文档内容会更加繁琐,并且没有官方的中文版本,所以我的建议是官方文档是第一手资料,但是你也可以看我的系列博客,我会尽可能的将官方文档的内容变得通俗易懂。