 迭代器模式:理解与实践
作者:鱼仔
博客首页: codeease.top (opens new window)
公众号:神秘的鱼仔
# (一)什么是迭代器模式
迭代器模式应该是23种设计模式中,程序员最容易理解的设计模式了,因为迭代器模式在日常的开发过程中经常使用到。以最常见的循环为例:
for(int i=0;i<arr.length;i++){
    System.out.print(arr[i]);
}
2
3
上面的这段代码通过循环逐一将arr的下标加1,从而实现了遍历数组的功能。
但是通过循环实现遍历的话依赖于集合对象内部,因此就有了一种能顺序访问集合对象中各个元素,又无需依赖对象内部表示的设计模式--迭代器模式。
# (二)迭代器模式中的角色
迭代器模式中的角色主要有4种:
1、迭代器接口(Iterator):定义访问和遍历集合元素的接口,一般包含next()和hasNext()方法。
2、具体迭代器(ConcreteIterator):该角色用于实现迭代器接口,迭代器的核心遍历逻辑在这里实现。
3、集合接口(Aggregate):集合接口定义了创建迭代器的接口方法,内部定义了iterator方法。
4、具体集合(ConcreteAggregate):该角色用于实现集合接口,他会创建出具体的Iterator角色。
看到这里如果你觉得比较疑惑不要紧,下面会通过代码的方式来加深理解。
# (三)迭代器模式的代码实现
首先说一下这段代码的场景,定义了一个教室的类,又定义了学生的类,实现遍历教室中学生的功能。
代码列表如下:
interface Aggregate:集合接口
interface Iterator:迭代器接口
class Classroom:教室类,实现集合接口,属于具体的集合
class ClassroomIterator:教室迭代器,实现迭代器接口,属于具体的迭代器
class Student:学生类
2
3
4
5
首先把迭代器模式中的两个接口角色定义出来:
public interface Aggregate {
    Iterator iterator();
}

public interface Iterator {
    boolean hasNext();
    Object next();
}
2
3
4
5
6
7
8
接着定义学生类:
@Data
@AllArgsConstructor
public class Student {
    private String name;
}
2
3
4
5
接着定义教室类,在教室类中我们定义了Student集合,以及当前的集合长度和最大长度。同时实现Aggregate接口的iterator方法,这个方法将会返回一个迭代器对象。这个迭代器对象由ClassroomIterator提供
public class Classroom implements Aggregate{
    private Student[] students;
    private int length=0;
    private int maxSize;

    public Classroom(int maxSize){
        this.maxSize=maxSize;
        students=new Student[maxSize];
    }

    public Student getStudent(int index){
        return students[index];
    }

    public boolean addStudent(Student student){
        if (length>=maxSize){
            return false;
        }
        this.students[length]=student;
        length++;
        return true;
    }

    public int getLength(){
        return this.length;
    }

    @Override
    public Iterator iterator() {
        return new ClassroomIterator(this);
    }
}
2
3
4
5
6
7
8
9
10
11
12
13
14
15
16
17
18
19
20
21
22
23
24
25
26
27
28
29
30
31
32
最后就是ClassroomIterator对象了,ClassroomIterator属于迭代器的具体实现,这里需要实现hasNext方法和next方法
public class ClassroomIterator implements Iterator{
    private Classroom classroom;
    private int index;

    public ClassroomIterator(Classroom classroom){
        this.classroom=classroom;
        this.index=0;
    }
    @Override
    public boolean hasNext() {
        if (this.index<classroom.getLength()){
            return true;
        }
        return false;
    }

    @Override
    public Object next() {
        Student student = classroom.getStudent(index);
        index++;
        return student;
    }
}
2
3
4
5
6
7
8
9
10
11
12
13
14
15
16
17
18
19
20
21
22
23
最后就是使用了,通过迭代器对象,我们可以直接遍历classroom对象:
public static void main(String[] args) {
    Classroom classroom=new Classroom(3);
    classroom.addStudent(new Student("张三"));
    classroom.addStudent(new Student("李四"));
    classroom.addStudent(new Student("王五"));
    Iterator iterator = classroom.iterator();
    while (iterator.hasNext()){
        Student next = (Student) iterator.next();
        System.out.println(next.getName());
    }
}
2
3
4
5
6
7
8
9
10
11
# (四)迭代器模式的作用
看到这里很多人可能会有疑问,写了一堆,用循环不是更方便吗?迭代器模式最大的作用是将遍历和具体的实现分开,以上面的测试方法为例,遍历时我们始终只用到了iterator对象,而没有用到classroom,这就意味着我们之后可以完全复用这段代码实现遍历。
另一方面,如果我们发现在classroom里使用数组存储student,后续无法扩容,想改为List集合,这个时候我们只需要修改ClassroomIterator和Classroom这两个具体实现角色即可。而不用对使用中的代码做任何修改,就比如上面这段测试遍历代码不需要任何变动。如果用的是for循环或者while循环,就意味着所有用到循环的地方都需要修改代码。
# (五)迭代器模式在源码中的应用
迭代器模式的应用我们在敲代码时肯定都用过,迭代器模式最佳实践就是JDK中Iterator接口的设计
public interface Iterator<E> {
    boolean hasNext();
    E next();
    default void remove() {
        throw new UnsupportedOperationException("remove");
    }
    default void forEachRemaining(Consumer<? super E> action) {
        Objects.requireNonNull(action);
        while (hasNext())
            action.accept(next());
    }
}
2
3
4
5
6
7
8
9
10
11
12
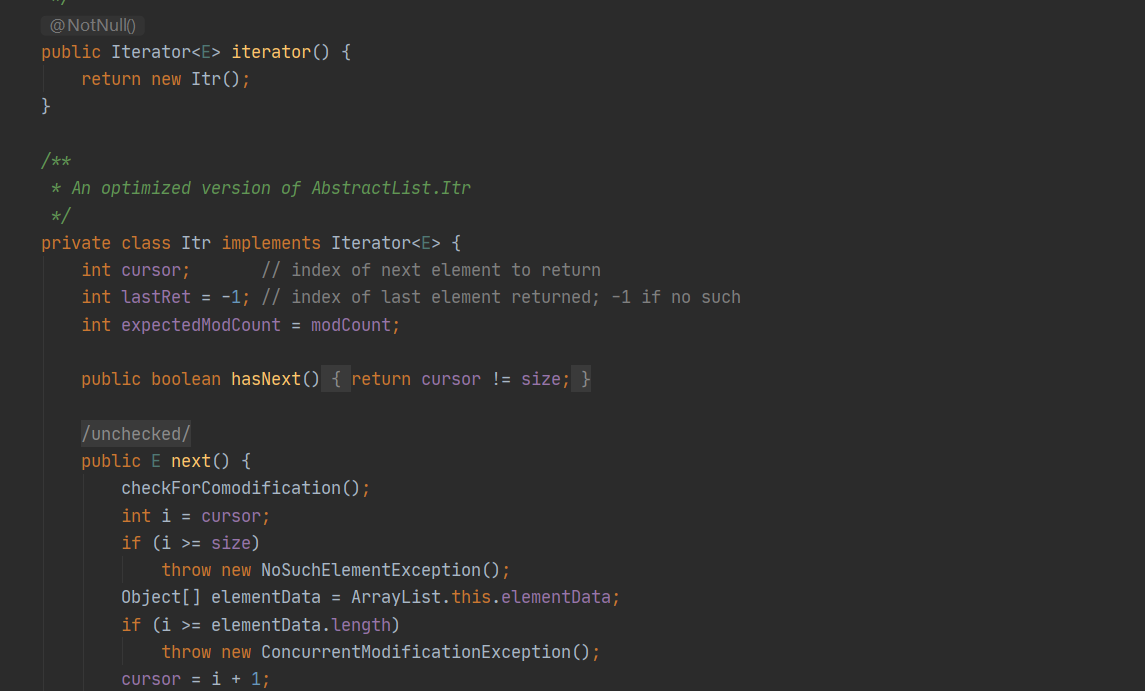
具体的迭代器实现最常用的就是集合,随便找个ArrayList看一下源码:

整体的实现逻辑和我们上面实现的基本上十分相似。
# (五)总结
在学习设计模式的时候,会慢慢开始理解为什么要设计接口,而不是直接写各种类。如果用具体的类去解决一个个需求,就会导致类之间的强依赖,这些类也难以被拆分出来作为组件复用。我是鱼仔,我们下期再见!
