 如何使用SpringBoot写一个属于自己的Starter
作者:鱼仔
博客首页: codeease.top (opens new window)
公众号:神秘的鱼仔
# (一)概述
SpringBoot以其自动装配的能力被广泛应用,我们在写代码时肯定遇到过很多spring-boot-starter命名的依赖,比如spring-boot-starter-web,在pom文件中引入这些starter依赖后,SpringBoot就能通过自动装配的技术扫描到这些类并装载到Bean容器中。
除了SpringBoot官方的这些Starter外,我们自己也可以开发Starter。为了和官方的starter区分,建议自定义的starter命名格式为xxxx-spring-boot-starter,比如mybatis-spring-boot-starter。
本文将介绍如何自己实现一个starter。
# (二)看个例子
在写自己的Starter之前,很有必要看一下别人是怎样去写的。这里拿RedisAutoConfiguration这个类作为例子。
SpringBoot在启动时会通过自动装配去扫描项目MATA-INF/spring.factories文件,这个文件中定义了所有需要去自动装配的类。Redis的自动装配类就是下图的RedisAutoConfiguration。

进入 RedisAutoConfiguration后,首先看最重要的几个注解,@Configuration不用多提了,@ConditionalOnClass表示当这个注解后面的类存在时,该Bean才会被加载。下图中很明显RedisOperations并不存在,所以Redis不会被自动装配进去。

@EnableConfigurationProperties用于自动加载配置类的信息,配置类和我们平常写的基本一样,通过ConfigurationProperties读取properties或者yaml中的配置信息。

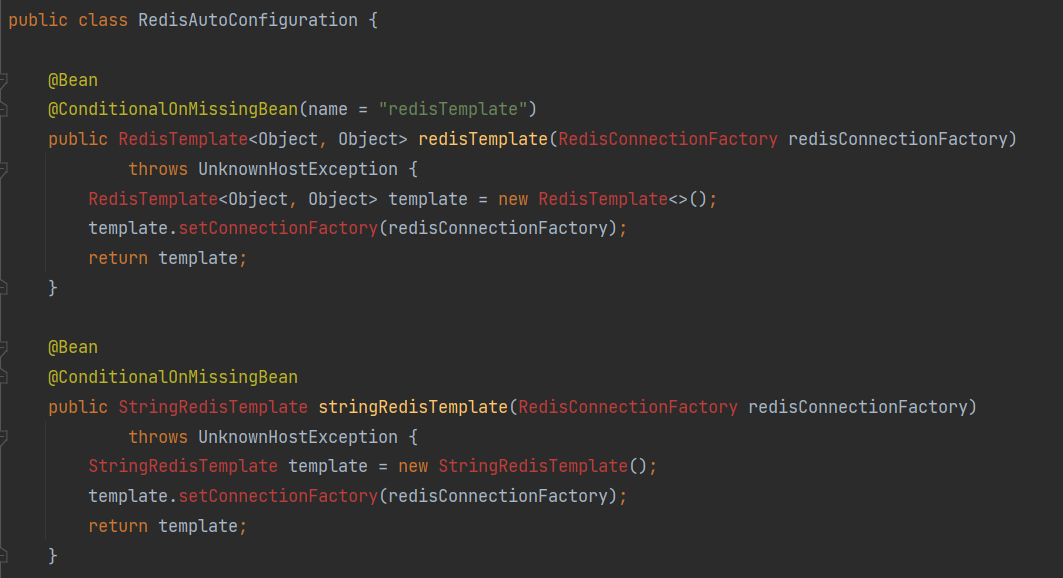
RedisAutoConfiguration这个类中定义的Bean有两个,我们应该都比较熟悉。@ConditionalOnMissingBean的意思是当Spring容器中不存在这个Bean的时候,才会加载这个Bean,所以如果我们在代码中自己定义了redisTemplate之后,注入到Bean容器中的就是我们自己写的那个Bean。
看到这里基本已经知道一个Starter的实现方案了,接下来就写一个简单的Starter。
# (三)实现信息播报Starter
要做的这个Starter其实很简单,就是输出配置文件中配置的信息。
首先新建一个Maven项目,在项目中新建两个Module,我给两个项目分别命名为report-spring-boot-starter和example-spring-boot
首先介绍report-spring-boot-starter,这是一个Starter,主要实现输出一些内容的功能,我们可以完全按照RedisAutoConfiguration去写。首先新建自动装配类:ReportAutoConfiguration
@Configuration
@ConditionalOnClass(ReportOperation.class)
@EnableConfigurationProperties(ReportProperties.class)
public class ReportAutoConfiguration {
    @Bean
    public ReportOperation reportOperation(ReportProperties reportProperties){
        ReportOperation reportOperation = new ReportOperation(reportProperties.getMsg());
        return  reportOperation;
    }
}
2
3
4
5
6
7
8
9
10
当ReportOperation存在时才会加载该配置,激活配置文件ReportProperties
public class ReportOperation {
    private String msg;
    public ReportOperation(String msg){
        this.msg = msg;
    }

    public String getMsg() {
        return msg;
    }

    public void setMsg(String msg) {
        this.msg = msg;
    }
    public String report(){
        return msg;
    }
}
2
3
4
5
6
7
8
9
10
11
12
13
14
15
16
17
ReportProperties如下:
@ConfigurationProperties(prefix = "report")
public class ReportProperties {
    private String msg;

    public void setMsg(String msg) {
        this.msg = msg;
    }

    public String getMsg() {
        return msg;
    }
}
2
3
4
5
6
7
8
9
10
11
12
接下来是实现自动注入的关键,前面已经说到了,SpringBoot会去扫描依赖Jar包中META-INF/spring.factories中的内容,因此在resources目录下新建META-INF/spring.factories,写下配置信息:
org.springframework.boot.autoconfigure.EnableAutoConfiguration=\
com.javayz.starter.ReportAutoConfiguration
2
这样一个简单的Starter就完成了。
# (四)调用这个Starter
接下来在example-spring-boot这个module中调用上面的starter,首先第一步引入相关依赖,这里只需要引入springboot相关依赖和自己写的starter依赖即可:
<dependency>
    <groupId>org.springframework.boot</groupId>
    <artifactId>spring-boot-autoconfigure</artifactId>
</dependency>
<dependency>
    <groupId>org.springframework.boot</groupId>
    <artifactId>spring-boot-starter-web</artifactId>
</dependency>
<dependency>
    <groupId>org.example</groupId>
    <artifactId>report-spring-boot-starter</artifactId>
    <version>1.0-SNAPSHOT</version>
    <scope>compile</scope>
</dependency>
2
3
4
5
6
7
8
9
10
11
12
13
14
接着写一个测试的controller测试自动注入的效果:
@RestController
public class TestController {
    @Autowired
    private ReportOperation reportOperation;

    @GetMapping("test")
    public String test(){
        System.out.println(reportOperation.getMsg());
        return reportOperation.getMsg();
    }
}
2
3
4
5
6
7
8
9
10
11
在配置文件中增加一条配置:
report.msg = hello
运行项目调用接口,可以发现ReportOperation这个Bean已经被自动注入了。
# (五)总结
本文结合redis自动注入的例子,写了一个属于自己的Starter,希望对大家有所帮助。我是鱼仔,我们下期再见!