 SpringBoot整合jdbc、durid、mybatis详解,数据库的连接就是这么简单
作者:鱼仔
博客首页: codeease.top (opens new window)
公众号:神秘的鱼仔
SpringBoot底层统一采用SpringData处理数据库,这一章主要来讲一下SpringBoot整合jdbc、durid、mybatis的方式。
# (一)整合jdbc
整合jdbc主要有三步: 1.引入依赖 2.配置数据源 3.访问 引入springdata启动器和mysql连接包
<dependency>
    <groupId>org.springframework.boot</groupId>
    <artifactId>spring-boot-starter-jdbc</artifactId>
</dependency>
<dependency>
    <groupId>mysql</groupId>
    <artifactId>mysql-connector-java</artifactId>
    <scope>runtime</scope>
</dependency>
2
3
4
5
6
7
8
9
在application.yaml或者application.properties中配置spring datasource数据源。在新版本的spring-boot-starter-jdbc,mysql驱动由原先的com.mysql.jdbc.Driver变为了com.mysql.cj.jdbc.Driver
spring:
  datasource:
    url: jdbc:mysql://localhost:3306/testsql?serverTimezone=UTC&useUnicode=true&characterEncoding=utf-8
    username: root
    password: 123456
    driver-class-name: com.mysql.cj.jdbc.Driver
2
3
4
5
6
通过jdbc模板访问
@RestController
public class JdbcController {
    @Autowired
    private JdbcTemplate jdbcTemplate;
    @GetMapping("/jdbc")
    public List<Map<String, Object>> query(){
        String sql="select * from user";
        List<Map<String, Object>> maps = jdbcTemplate.queryForList(sql);
        return maps;
    }
}
2
3
4
5
6
7
8
9
10
11
# (二)整合druid
druid是阿里巴巴公司开发的数据库连接池,它的官网称Druid是Java语言中最好的数据库连接池。Druid能够提供强大的监控和扩展功能。 druid的使用首先也是引入依赖
<!-- https://mvnrepository.com/artifact/com.alibaba/druid -->
<dependency>
    <groupId>com.alibaba</groupId>
    <artifactId>druid</artifactId>
    <version>1.1.23</version>
</dependency>
2
3
4
5
6
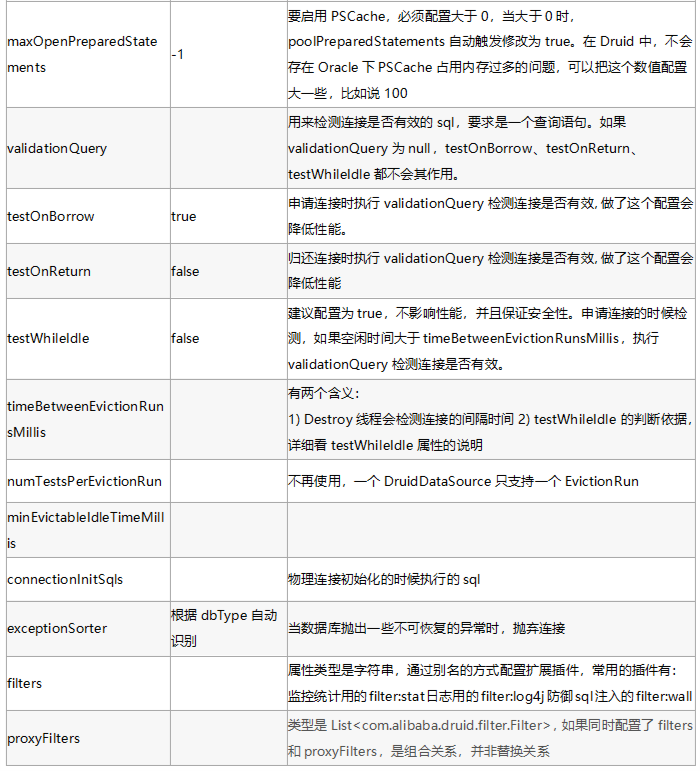
com.alibaba.druid.pool.DruidDataSource 基本配置参数如下:


Spring Boot 2.0 以上默认使用 com.zaxxer.hikari.HikariDataSource 数据源,但可以通过 spring.datasource.type 指定数据源。我们将type修改为druid。
设置完数据源后,就可以设置数据源连接初始化大小、最大连接数、等待时间、最小连接数 等设置项
spring:
  datasource:
    url: jdbc:mysql://localhost:3306/myssh?serverTimezone=UTC&useUnicode=true&characterEncoding=utf-8
    username: root
    password: 123456
    driver-class-name: com.mysql.cj.jdbc.Driver
    type: com.alibaba.druid.pool.DruidDataSource

    #连接池属性
    #Spring Boot 默认是不注入这些属性值的,需要自己绑定
    #druid 数据源专有配置
    initialSize: 5
    minIdle: 5
    maxActive: 20
    maxWait: 60000
    timeBetweenEvictionRunsMillis: 60000
    minEvictableIdleTimeMillis: 300000
    validationQuery: SELECT 1 FROM DUAL
    testWhileIdle: true
    testOnBorrow: false
    testOnReturn: false
    poolPreparedStatements: true

    #配置监控统计拦截的filters,stat:监控统计、log4j:日志记录、wall:防御sql注入
    #如果允许时报错  java.lang.ClassNotFoundException: org.apache.log4j.Priority
    #则导入 log4j 依赖即可,Maven 地址:https://mvnrepository.com/artifact/log4j/log4j
    filters: stat,wall,log4j
    maxPoolPreparedStatementPerConnectionSize: 20
    useGlobalDataSourceStat: true
    connectionProperties: druid.stat.mergeSql=true;druid.stat.slowSqlMillis=500
2
3
4
5
6
7
8
9
10
11
12
13
14
15
16
17
18
19
20
21
22
23
24
25
26
27
28
29
30
因为在配置文件中使用了log4j,因此我们也需要引入log4j的依赖。
最后编写配置类,ConfigurationProperties注解大家都很熟悉了,从配置文件的spring.datasource下读取配置。statViewServlet方法配置后台监控功能,主要设置ip黑白名单,用户名密码等。statFilter用于配置过滤器等消息。
@Configuration
public class DruidConfig {

    @ConfigurationProperties("spring.datasource")
    @Bean
    public DataSource druidDataSource(){
        return new DruidDataSource();
    }

    //后台监控
    //因为SpringBoot内置了servlet容器,所以没有web.xml,替代方法:ServletRegisterationBean
    @Bean
    public ServletRegistrationBean statViewServlet(){
        //创建servlet注册实体
        ServletRegistrationBean servletRegistrationBean = new ServletRegistrationBean(new StatViewServlet(),"/druid/*");
        //设置ip白名单
        servletRegistrationBean.addInitParameter("allow","127.0.0.1");
        //设置ip黑名单,如果allow与deny共同存在时,deny优先于allow
        servletRegistrationBean.addInitParameter("deny","192.168.0.19");
        //设置控制台管理用户
        servletRegistrationBean.addInitParameter("loginUsername","druid");
        servletRegistrationBean.addInitParameter("loginPassword","123456");
        //是否可以重置数据
        servletRegistrationBean.addInitParameter("resetEnable","false");
        return servletRegistrationBean;
    }

    @Bean
    public FilterRegistrationBean statFilter(){
        //创建过滤器
        FilterRegistrationBean filterRegistrationBean = new FilterRegistrationBean(new WebStatFilter());
        //设置过滤器过滤路径
        filterRegistrationBean.addUrlPatterns("/*");
        //忽略过滤的形式
        filterRegistrationBean.addInitParameter("exclusions","*.js,*.gif,*.jpg,*.png,*.css,*.ico,/druid/*");
        return filterRegistrationBean;
    }
}
2
3
4
5
6
7
8
9
10
11
12
13
14
15
16
17
18
19
20
21
22
23
24
25
26
27
28
29
30
31
32
33
34
35
36
37
38
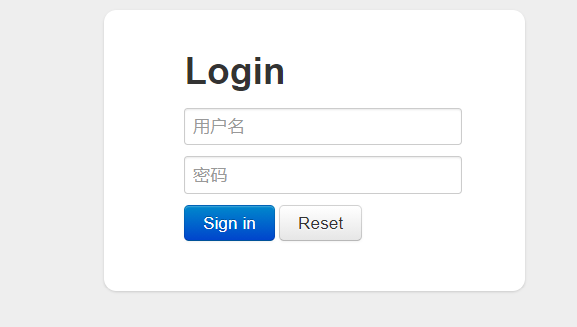
最后输入http://localhost:8080/druid/login.html进入登陆页面

进入主页后可以看到druid所提供的强大功能。关于druid更多的内容可以从https://github.com/alibaba/druid获取

# (三)整合Mybatis
在项目中基本上不会使用jdbc直接连接数据库,对数据库的操作往往会通过一些持久层的框架,下面来讲讲Mybatis的整合,Mybatis的整合分为以下几步: 1.导入包 2.配置文件 3.mybatis配置 4.编写sql 5.调用 整合包 mybatis-spring-boot-starter
<!-- https://mvnrepository.com/artifact/org.mybatis.spring.boot/mybatis-spring-boot-starter -->
<dependency>
    <groupId>org.mybatis.spring.boot</groupId>
    <artifactId>mybatis-spring-boot-starter</artifactId>
    <version>2.1.3</version>
</dependency>
2
3
4
5
6
配置mybatis,这里主要配置了type-aliases-package和mapper-locations
spring:
  datasource:
    url: jdbc:mysql://localhost:3306/myssh?serverTimezone=UTC&useUnicode=true&characterEncoding=utf-8
    username: root
    password: 123456
    driver-class-name: com.mysql.cj.jdbc.Driver
mybatis:
  type-aliases-package: com.javayz.springbootdemo.pojo
  mapper-locations: classpath:mybatis/mapper/*.xml
2
3
4
5
6
7
8
9
编写Mapper接口,到这里都属于Mybatis的基础操作,就不做介绍了
@Mapper
@Repository
public interface UserSelectMapper {
    List<User> queryUserList();
}
2
3
4
5
mapper.xml配置文件编写sql语句
<?xml version="1.0" encoding="UTF-8"?>
<!DOCTYPE mapper PUBLIC "-//mybatis.org//DTD Mapper 3.0//EN"
        "http://mybatis.org/dtd/mybatis-3-mapper.dtd">
<mapper namespace="com.javayz.springbootdemo.mapper.UserSelectMapper">
    <select id="queryUserList" resultType="User">
        select * from user
    </select>
</mapper>
2
3
4
5
6
7
8
# (四)总结
在这篇文章中我主要介绍了SpringBoot中jdbc、durid、mybatis的整合,SpringBoot的整合步骤基本都一致,引入依赖、配置文件、调用。
